OpenShift Pod Scheduling Algorithms
The pod scheduler determines placement of pods onto nodes in Openshift cluster. The default configuration shipped with OpenShift Container Platform supports the common data center concepts of zones and regions by using node labels, affinity rules, and anti-affinity rules. It is designed to be highly configurable and adaptable to different clusters.
OpenShift pod scheduler algorithm mainly follows three step process:
Filtering nodes:
The scheduler filters the list of running nodes by evaluating each node against a set of predicates, such as the availability of host ports, or whether a pod can be scheduled to a node experiencing either disk or memory pressure.
A pod can also requests for compute resources such as CPU, memory, and storage. Nodes that have insufficient free computer resources are not eligible.
Additionally, a pod can define a node selector that matches the labels in the cluster nodes. Nodes whose labels do not match are not eligible.
Another filtering check evaluates if the list of nodes have any taints, and if so whether the pod has an associated toleration that can accept the taint. If a pod cannot accept the taint of a node, then the node is not eligible. By default, master nodes include the taint node-role.kubernetes.io/master:NoSchedule. A pod that does not have a matching toleration for this taint will not be scheduled to a master node.
The end result of the filtering step is typically a shorter list of node candidates that are eligible to run the pod. In some cases, none of the nodes are filtered out, which means the pod could run on any of the nodes. In other cases, all of the nodes are filtered out, which means the pod cannot be scheduled until a node with the desired prerequisites becomes available.
Prioritizing the filtered list of nodes.Prioritizing the filtered list of nodes:
The list of candidate nodes is evaluated using multiple priority criteria that add up to a weighted score. Nodes with higher values are better candidates to run the pod.
Among the criteria are affinity and anti-affinity rules. Nodes with higher affinity for the pod have a higher score, and nodes with higher anti-affinity have a lower score.
A common use for affinity rules is to schedule related pods to be close to each other, for performance reasons. An example is to use the same network backbone for pods that synchronize with each other.
A common use for anti-affinity rules is to schedule related pods that are not too close to each other, for high availability. An example is to avoid scheduling all pods from the same application to the same node.
Selecting the best fit node
The node list is sorted based on above matrix scores, and the node with the highest score is selected to host the pod. If multiple nodes have the same high score, then one is selected in a round-robin fashion.
The scheduler is flexible and can be customized for advanced scheduling situations. Pods can also be placed using pod affinity and anti-affinity rules, as well as node affinity and anti-affinity rules.
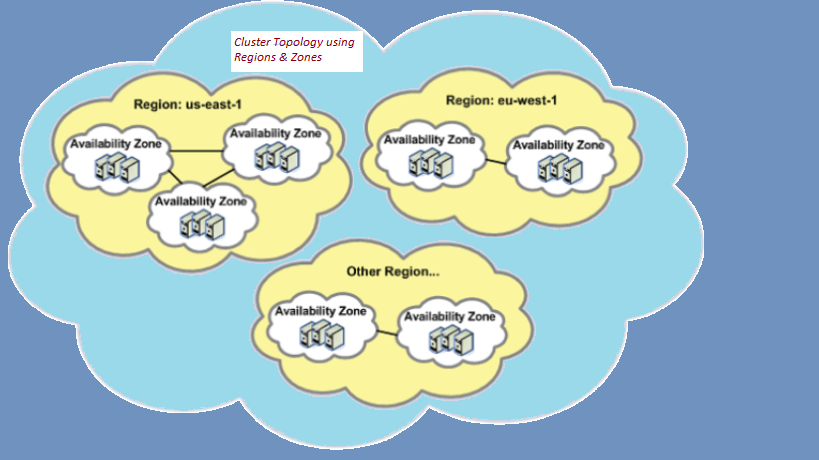
Scheduling and Topology
To maintain large data centers, such as cloud providers a common topology is to organize hosts into regions and zones.
- A region is a set of hosts in a close geographic area, which guarantees high-speed connectivity between them.
- A zone is a set of hosts that might fail together because they share common critical infrastructure components, such as a network switch, a storage array, or a uninterruptible power supply (UPS).
As an example of regions and zones, Amazon Web Services (AWS) has a region in northern Virginia (us-east-1) with 6 availability zones, and another region in Ohio (us-east-2) with 3 availability zones. Each of the AWS availability zones can contain multiple data centers potentially consisting of hundreds of thousands of servers.
The standard configuration of the OpenShift pod scheduler supports this kind of cluster topology by defining predicates based on the region and zone labels. The predicates are defined in such a way that:
- Replica pods, created from the same deployment (or deployment configuration), are scheduled to run on nodes that have the same value for the region label.
- Replica pods are scheduled to run on nodes that have different values for the zone label.
Labeling Nodes
We can add additional labels to the nodes. For example, we might label nodes with the env label using the values of dev, qa, or prod with the intent that development, quality assurance, and production workloads will be deployed to a specific subset of nodes. The labels we choose are arbitrary, but we must publish the labels and their associated values to our developers so that they can configure their applications appropriately.
Use oc label command to immediately add, update, or remove a node label. For example, use the following command to label a node with env=prod:
[user@onionlinux ~]$ oc label node node1.us-west-1.compute.internal env=prod
Use the --overwrite option to change an existing label.
[user@onionlinux ~]$ oc label node node1.us-west-1.compute.internal env=dev --overwrite
Remove a label by specifying the label name followed by a hyphen, such as env-.
[user@onionlinux ~]$ oc label node node1.us-west-1.compute.internal env-
Use the --show-labels option with the oc get nodes command to see the case-sensitive labels assigned to a node.
[user@onionlinux ~]$ oc get node node2.us-west-1.compute.internal --show-labels
NAME ... ROLES ... LABELS
node2.us-west-1.compute.internal ... worker ... beta.kubernetes.io/arch=amd64,beta.kubernetes.io/instance-type=m4.xlarge,beta.kubernetes.io/os=linux,tier=gold,failure-domain.beta.kubernetes.io/region=us-west-1,failure-domain.beta.kubernetes.io/zone=us-west-1c,kubernetes.io/arch=amd64,kubernetes.io/hostname=node2,kubernetes.io/os=linux,node-role.kubernetes.io/worker=,node.openshift.io/os_id=rhcos
A node might have several default labels assigned by OpenShift. Labels whose keys include the kubernetes.io suffix should not be changed by a cluster administrator because they are used internally by the scheduler.
Cluster administrators can also use the -L option to determine the value of a single label. For example:
[user@onionlinux ~]$ oc get node -L failure-domain.beta.kubernetes.io/region
NAME ... ROLES ... REGION
ip-10-0-131-24.us-west-1.compute.internal ... master ... us-west-1
ip-10-0-139-25.us-west-1.compute.internal ... worker ... us-west-1
ip-10-0-141-104.us-west-1.compute.internal ... master ... us-west-1
ip-10-0-152-50.us-west-1.compute.internal ... master ... us-west-1
ip-10-0-154-126.us-west-1.compute.internal ... worker ... us-west-1
Multiple -L options in the same oc get command are supported. For example:
[user@onionlinux ~]$ oc get node -L failure-domain.beta.kubernetes.io/region \
> -L failure-domain.beta.kubernetes.io/zone -L env
NAME ... REGION ZONE ENV
ip-10-0-131-24.us-west-1.compute.internal ... us-west-1 us-west-1b
ip-10-0-139-25.us-west-1.compute.internal ... us-west-1 us-west-1b dev
ip-10-0-141-104.us-west-1.compute.internal ... us-west-1 us-west-1b
ip-10-0-152-50.us-west-1.compute.internal ... us-west-1 us-west-1c
ip-10-0-154-126.us-west-1.compute.internal ... us-west-1 us-west-1c
Labeling Machine Sets
Although node labels are persistent, if your OpenShift cluster contains machine sets (created if your cluster was installed using the full stack automation method), then you should also add labels to the machine set configuration. This ensures that new machines (and the nodes generated from them) will also contain the desired labels.
You can identify the relationship between machines and nodes by listing machines in the openshift-machine-api namespace and including the -o wide option.
[user@oninlinux ~]$ oc get machines -n openshift-machine-api -o wide
NAME ... NODE
...output omitted...
ocp-qz7hf-worker-us-west-1b-rvx6w ... ip-10-0-139-25.us-west-1.compute.internal
ocp-qz7hf-worker-us-west-1c-v4n4n ... ip-10-0-154-126.us-west-1.compute.internal
Machines used for worker nodes should come from a machine set. The name of a machine contains the name of the machine set from which it was generated.
[user@onionlinux ~]$ oc get machineset -n openshift-machine-api
NAME DESIRED CURRENT READY AVAILABLE ...
ocp-qz7hf-worker-us-west-1b 1 1 1 1 ...
ocp-qz7hf-worker-us-west-1c 1 1 1 1 ...
We can also edit a machine set so that new machines generated from it will have the desired label or labels. Modifying a machine set will not apply changes to existing machines or nodes.
[user@onionlinux ~]$ oc edit machineset ocp-qz7hf-worker-us-west-1b -n openshift-machine-api
The highlighted lines below show where to add a label within a machine set.
...output omitted...
spec:
metadata:
creationTimestamp: null
labels:
env: dev
providerSpec:
...output omitted...
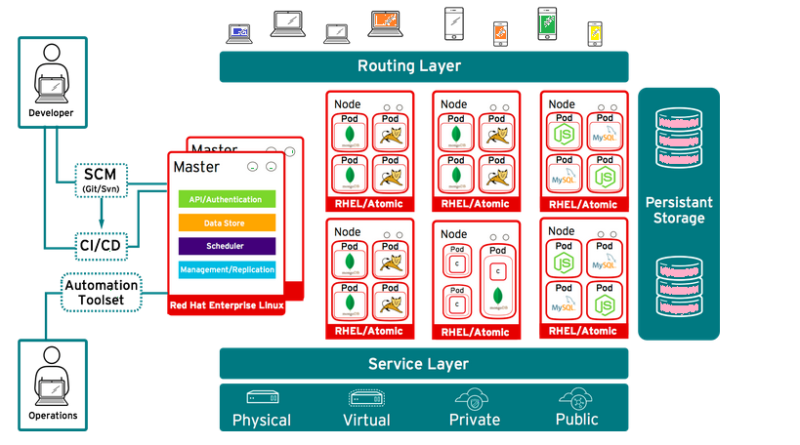
Controlling Pod Placement
Many infrastructure-related pods in an OpenShift cluster are configured to run on master nodes. Examples include pods for the DNS operator, the OAuth operator, and the OpenShift API server. In some cases, this is accomplished by using the node selector node-role.kubernetes.io/master: '' in the configuration of a daemon set or a replica set.
Similarly, some user applications might require running on a specific set of nodes. For example, certain nodes provide hardware acceleration for certain types of workloads, or the cluster administrator does not want to mix production applications with development applications. Use node labels and node selectors to implement these kinds of scenarios.
A node selector is part of an individual pod definition. Define a node selector in either a deployment or a deployment configuration resource, so that any new pod generated from that resource will have the desired node selector. If your deployment or deployment configuration resource is under version control, then modify the resource file and apply the changes using the oc apply -f command.
A node selector can be added or modified using either the oc edit command or the oc patch command. For example, to configure the myapp deployment so that its pods only run on nodes that have the env=qa label, use the oc edit command:
[user@onionlinux ~]$ oc edit deployment/myapp
...output omitted...
spec:
...output omitted...
template:
metadata:
creationTimestamp: null
labels:
app: myapp
spec:
nodeSelector:
env: dev
containers:
- image: quay.io/redhattraining/scaling:v1.0
...output omitted...
The following oc patch command accomplishes the same thing:
[user@onionlinux ~]$ oc patch deployment/myapp --patch '{"spec":{"template":{"spec":{"nodeSelector":{"env":"dev"}}}}}'
Whether using the oc edit command or the oc patch command, the change triggers a new deployment and the new pods are scheduled according to the node selector.
Configuring a Node Selector for a Project
If the cluster administrator does not want developers controlling the node selector for their pods, then a default node selector should be configured in the project resource. A cluster administrator can either define a node selector when a project is created, or can add or update a node selector after a project is created. Use the oc adm new-project command to add the node selector at project creation. For example, the following command creates a new project named webapp, where all pods will be deployed to nodes that have the label of tier=1.
[user@onionlinux ~]$ oc adm new-project webapp --node-selector "tier=1"
To configure a default node selector for an existing project, add an annotation to the namespace resource with the openshift.io/node-selector key. The oc annotate command can add, modify, or remove a node selector annotation:
[user@onionlinux ~]$ oc annotate namespace webapp openshift.io/node-selector="tier=2" --overwrite
Scaling the Number of Pod Replicas
Although most deployment and deployment configuration resources start with creating a single pod, the number of replicas (or copies) of a pod is frequently increased. This is accomplished by scaling the deployment or deployment configuration. Multiple methods for scaling will be covered later, but one method uses the oc scale command. For example, the number of pods in the myapp deployment can be scaled to three using the following command:
[user@onionlinux ~]$ oc scale --replicas 3 deployment/webapp
To know more about Controlling pod placement onto nodes (scheduling) chapter in the Red Hat OpenShift Container Platform go here
To know more about regions and zones, please go here
You can also read Kubernetes and OpenShift Architecture in my another post Architecture of Kubernetes & OpenShift.
I hope you like this post, if you have any questions? please leave comment below!
Read this article To understand Computer Science Algorithm basics.
Thanks for reading. If you like this post probably you might like my next ones, so please support me by subscribing my blog.
Good work
Thanks Savan
please subscribe my website to get update of all posts.
Very well Rohit
Thanks Akash, please subscribe my website to get all updates.
Excellent
Thank you
Very helpful for technical zone.
You are doing great things.
Best of luck bro.
thanks to provide this excellent material
Thanks Ashutosh, please subscribe my website to get all updates.
Rohit, Its Very good articulation. I have also posted in my web page in FB: https://www.facebook.com/vskumarcloud/
Thanks Shanthi, please subscribe my website to get all updates.
Pingback: Latest technical articles & videos. - CertDepot