
How to setup Kubernetes Cluster in local
To setup the Kubernetes cluster in the local system, you have to use minikube. To setup minikube there are two ways Docker (or similarly compatible) container or a Virtual Machine environment. I will be using a Virtual machine to setup my minikube in this tutorial.
Prerequisites to setup minikube
- 2GB of free memory
- 2 CPUs or more
- 20GB of free disk space
- Internet connection
- Container or virtual machine managers, such as Docker, Hyperkit, Hyper-V, KVM, Parallels, Podman, VirtualBox, or VMWare
Installation of minikube in Mac OS
Minikube requires that VT-x/AMD-v virtualization is enabled in BIOS. To check that this is enabled on OSX / macOS run the below command and if it gives an output then you are good to go.
$ sysctl -a | grep machdep.cpu.features | grep VMX

Install the VirtualBox as a HyperVisor using the homebrew package manager with the following command.
$ brew cask install virtualbox

Install Minikube with the following command.
$ brew install minikube
Run which minikube after installation, if it fails you may have to remove the old minikube link and link the newly installed binary.
$ brew unlink minikube
$ brew link minikube
You can also install by downloading minikube directly
x86
curl -LO https://storage.googleapis.com/minikube/releases/latest/minikube-darwin-amd64
sudo install minikube-darwin-amd64 /usr/local/bin/minikube
ARM
curl -LO https://storage.googleapis.com/minikube/releases/latest/minikube-darwin-arm64
sudo install minikube-darwin-arm64 /usr/local/bin/minikube
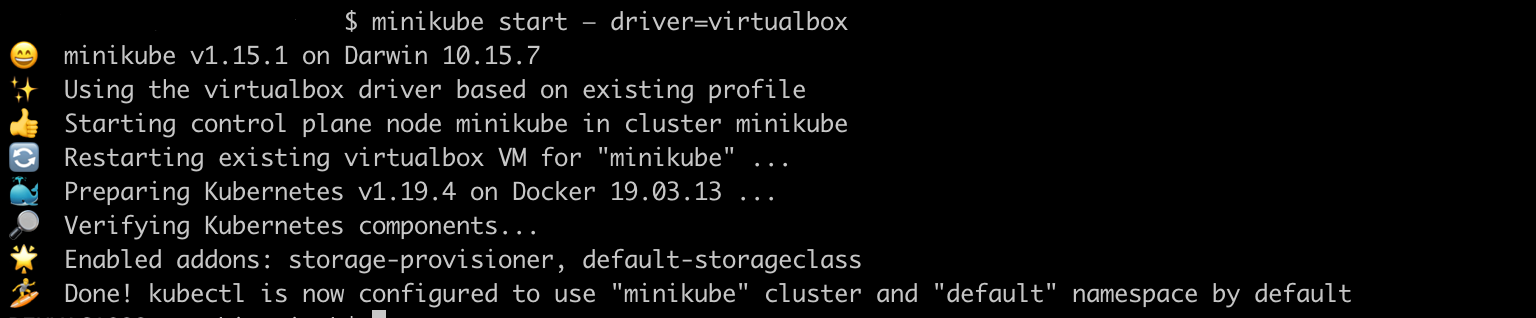
To start minikube with virtual box use below command
$ minikube start — driver=virtualbox
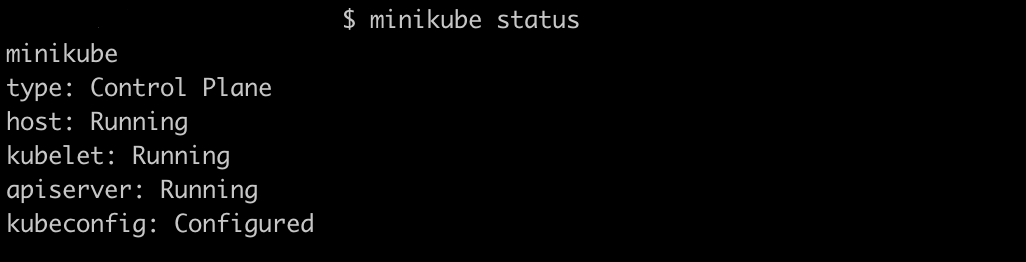
Check minikube status by running the below command
$ minikube status
Installation of minikube in Linux OS
Minikube supports 3 download options Binary download, Debian & RPM packages for different kinds of system architectures i.e amd64/x86_64 & arm64/aarch64.
arm64 / aarch64:
Binary download
curl -LO https://storage.googleapis.com/minikube/releases/latest/minikube-linux-arm64
sudo install minikube-linux-arm64 /usr/local/bin/minikube
Debian package
curl -LO https://storage.googleapis.com/minikube/releases/latest/minikube_latest_arm64.deb
sudo dpkg -i minikube_latest_arm64.deb
RPM package
curl -LO https://storage.googleapis.com/minikube/releases/latest/minikube-latest.aarch64.rpm
sudo rpm -ivh minikube-latest.aarch64.rpm
amd64 / x86_64:
Binary download
curl -LO https://storage.googleapis.com/minikube/releases/latest/minikube-linux-amd64
sudo install minikube-linux-amd64 /usr/local/bin/minikube
Debian package
curl -LO https://storage.googleapis.com/minikube/releases/latest/minikube_latest_amd64.deb
sudo dpkg -i minikube_latest_amd64.deb
RPM package
curl -LO https://storage.googleapis.com/minikube/releases/latest/minikube-latest.x86_64.rpm
sudo rpm -ivh minikube-latest.x86_64.rpm
Installation of minikube in Windows
There are 3 ways to install minikube in windows
Windows Package Manager: If Windows Package Manager is installed in the system use the below command to install minikube.
winget install minikube
Chocolaty Package Manager: If the Chocolaty Package Manager installed, use the following command
choco install minikube
Stand Alone Windows Installer: You can download and run the Windows Installer
Create a deployment in Cluster
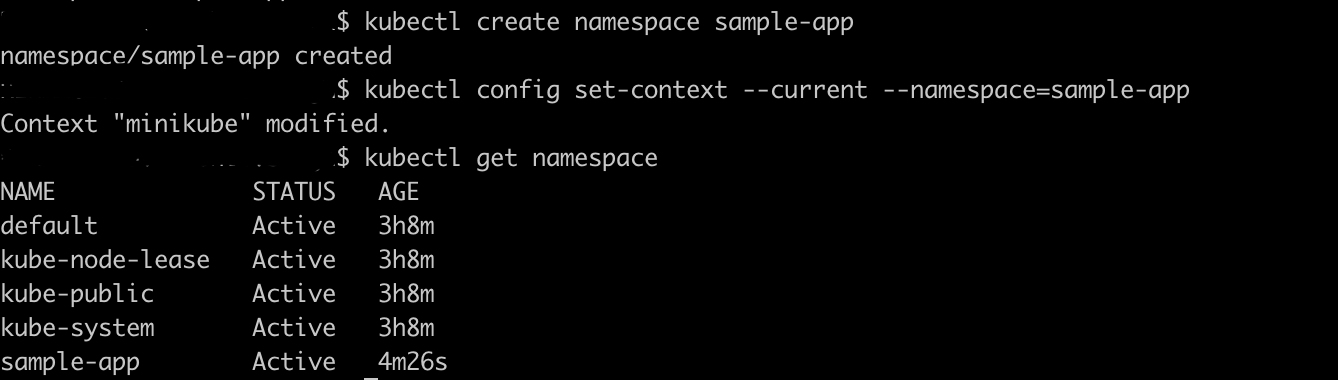
Create a namespace use below command
$ kubectl create namespace sample-app
set-context using the below command for the created namespace.
$ kubectl config set-context --current --namespace=sample-app
Create a deployment using a simple-web image, use the following command
$ kubectl create deployment myapp --image=yeasy/simple-web:latest

To list deployment use the following command
$ kubectl get deployment
To expose the service on port 80 use the following command.
$ kubectl expose deployment myapp --type=NodePort --port=80

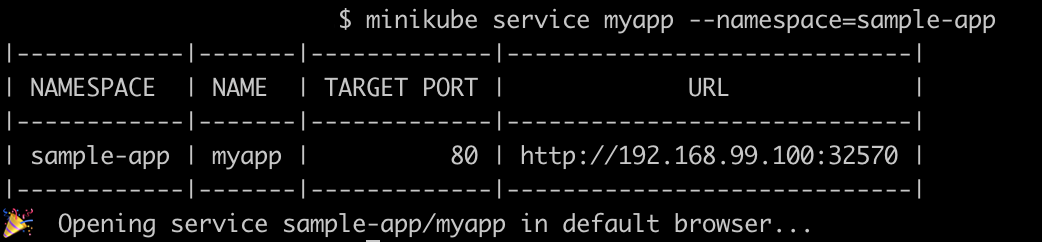
To check the deployed application use the below command, which will open a page in a web browser.
$ minikube service myapp --namespace=sample-app
In-Browser
To scale up pods use the following command
$ kubectl scale deploymeny/myapp --replica=4

To create loadbalancer deployment use the following commands
$ kubectl create deployment myapp --image=yeasy/simple-web:latest

$ kubectl expose deployment myapp --type=LoadBalancer --port=80
In another window, start the tunnel to create routable IP for the ‘myapp’ deployment
$ minikube tunnel
To find the routable IP, run this command and examine the EXTERNAL-IP column:
$ kubectl get services myapp
Managing the Cluster
Browse the catalog of easily installed Kubernetes services
$ minikube addons list
Increase the default memory limit (it requires a restart after change)
$ minikube config set memory 9261
Create a second cluster running an older Kubernetes release:
$ minikube start -p aged --kubernetes-version=v1.16.1
Pause Kubernetes without impacting deployed applications:
$ minikube pause
Halt Kubernetes cluster:
$ minikube stop
Delete all of minikube clusters:
$ minikube delete --all
You can read more about Kubernetes Architecture in my another post Architecture of Kubernetes & OpenShift
You may like also : How to Optimize for Google Discover feed
I hope you like this post, if you have any questions? please leave a comment below!
Thanks for reading. If you like this post probably you might like my next ones, so please support me by subscribing to my blog.
Pingback: Open-Source Tools to monitor Kubernetes Cluster — OnionLinux