
Discovering the MKR IoT Carrier
Embark on an exciting journey with the MKR IoT Carrier to uncover its core features and functionalities. This introductory project will guide you through setting up and programming the carrier to read sensor data and display it. Perfect for beginners, this activity serves as an essential primer before diving into other projects with the Arduino Oplà IoT Kit.
What is MKR IoT Carrier?
The MKR IoT Carrier is a versatile and powerful development platform designed to facilitate the creation and deployment of Internet of Things (IoT) solutions. This platform is specifically designed to simplify the process of building IoT applications, making it accessible to both beginners and experienced engineers. MKR IoT Carrier provide extensive range of built-in sensors and actuators. These include temperature and humidity sensors, a light sensor, a gyroscope and an RGB LED, among others. Such integrated components eliminate the need for additional hardware, thus streamlining the development process.
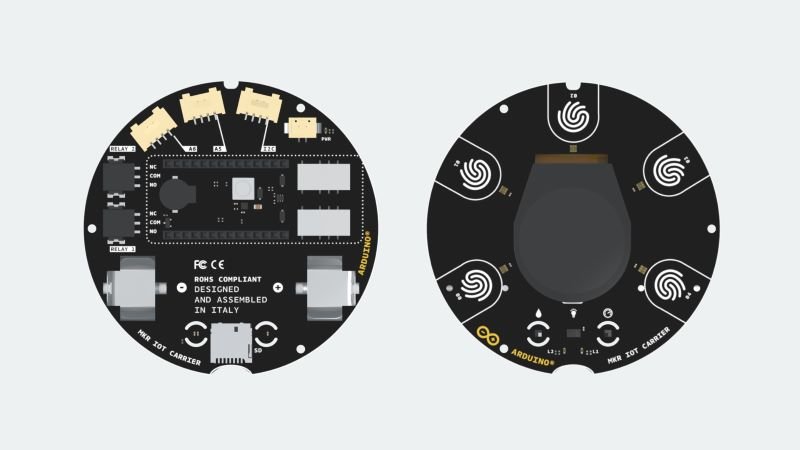
Additionally, the carrier includes a color display, buttons, and a rotary encoder, providing users with an interactive interface to control and monitor their IoT projects. Compatibility is another significant feature of the MKR IoT Carrier. It is designed to work seamlessly with various Arduino MKR boards, such as the MKR WiFi 1010, MKR GSM 1400, and MKR NB 1500. This compatibility ensures that users can leverage the specific connectivity options they need, whether it be Wi-Fi, GSM, or NB-IoT, to suit their project requirements. Furthermore, the carrier supports integration with popular IoT platforms, facilitating data collection, analysis, and remote management.
Why MKR IoT Carrier is Important?
The MKR IoT Carrier is particularly valuable for educational purposes, providing students with a hands-on learning experience in IoT development. For hobbyists, it offers a user-friendly and cost-effective solution to prototype and experiment with IoT applications. Professional developers benefit from its robust and scalable design, enabling the rapid development and deployment of complex IoT systems. Overall, the MKR IoT Carrier stands out as an essential tool for anyone looking to explore and innovate within the IoT space.
Learning Objectives
By the end of this project, you will:
- Understand the different components of the MKR IoT Carrier.
- Learn about the MKRIoTCarrier library and how to utilize it in sketches.
- Build a basic application showcasing the carrier’s various functions.
Components Used
- Arduino MKR WiFi 1010
- MKR IoT Carrier
- Micro USB cable
Key Features and Specifications
Here are some features & specifications of MKR IoT Carrier:
- In terms of actuators, the MKR IoT Carrier includes relays and LEDs. The relays can be used to control high-power devices, enabling users to switch devices on and off remotely. Meanwhile, the RGB LEDs offer a visual indicator for various statuses or alerts, providing immediate feedback directly on the device. These components together create a robust platform capable of managing complex IoT tasks.
- Connectivity is another area where the MKR IoT Carrier excels. It supports both WiFi and Bluetooth, ensuring seamless communication between devices and the internet. This dual connectivity helps in creating flexible and scalable IoT systems that can operate in different network environments. WiFi is ideal for constant, high-throughput data transmission, while Bluetooth provides a low-energy option for close-range communication.
- The design of the MKR IoT Carrier is user-friendly and intuitive. It features a circular OLED display that provides clear, real-time data visualization. The touch buttons surrounding the display offer an easy-to-use interface for interacting with the carrier. Furthermore, the inclusion of Grove connectors simplifies the process of expanding the carrier’s capabilities with additional sensors and modules, making it highly adaptable to various project needs.
These key features and specifications make the MKR IoT Carrier an invaluable tool for developers. Its advanced sensors, reliable actuators.
Getting to Know the Kit
The Brain: Arduino MKR WiFi 1010
The Arduino MKR WiFi 1010 board, the heart of the Oplà IoT Kit, enables wireless WiFi or Bluetooth connections. Part of the MKR family, this board can connect seamlessly to the MKR IoT Carrier, facilitating various features and functionalities.
The Extension: MKR IoT Carrier
The MKR IoT Carrier extends the capabilities of the MKR WiFi 1010 board. It includes built-in sensors and circuits, such as temperature and humidity sensors, an accelerometer, a light sensor, and more. This setup saves time and allows you to focus on programming and creating innovative applications.
Assembly
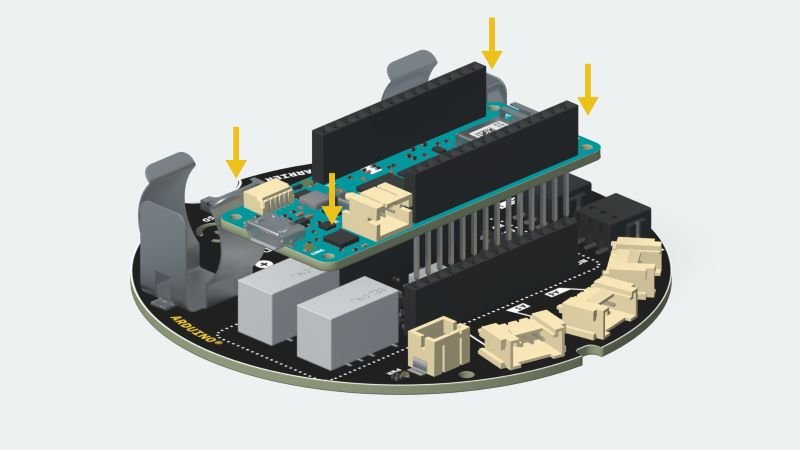
Mount the Arduino MKR WiFi 1010 onto the MKR IoT Carrier and connect it to your computer. Ensure correct alignment by matching the pin numbers on the board and the carrier.
Using the Plastic Casing
For portability and protection, place the MKR IoT Carrier in the plastic casing. Remember to set CARRIER_CASE = true; in the void setup() to enable the capacitive buttons through the casing.
Powering the Device
You can power the device through a USB cable or a 3.7V 18650 Li-Ion battery. Note that using a battery limits viewing options on the Serial Monitor, as it requires a direct computer connection. Remove the line while (!Serial); in the void setup() if using a battery.
Setting Up the MKR IoT Carrier
Setting up the MKR IoT Carrier involves a series of straightforward steps that ensure your device is ready for various Internet of Things (IoT) applications. This guide will walk you through the physical connection of the carrier to an Arduino MKR board, the installation of necessary software and libraries, and the initial configurations required to get your system up and running.
Physical Connection
Start by securely attaching the MKR IoT Carrier to your Arduino MKR board. Align the headers of the carrier with the corresponding pins on the MKR board and gently press them together until you hear a click, indicating a secure connection. Ensure that all pins are correctly aligned to avoid any damage to the board or carrier.
Software and Libraries Installation
Next, you will need to install the required software and libraries. Begin by downloading the Arduino IDE from the official Arduino website if you haven’t already. After installing the IDE, open it and navigate to the Library Manager by selecting Sketch > Include Library > Manage Libraries. Search for and install the Arduino_MKRIoTCarrier library, which contains essential drivers and example codes for the MKR IoT Carrier.
Initial Configuration
Once the libraries are installed, it’s time to configure your device. Connect your MKR board to your computer using a USB cable. Open the Arduino IDE, select your board model from Tools > Board, and choose the appropriate port under Tools > Port. Load an example sketch from the installed Arduino_MKRIoTCarrier library to verify the setup. Upload the sketch to your board by clicking the upload button in the Arduino IDE. You should see the onboard LEDs and sensors responding as expected.
Troubleshooting Tips
If you encounter issues during setup, consider the following troubleshooting tips:
- Double-check all physical connections to ensure the carrier and board are securely connected.
- Verify that you have selected the correct board model and port in the Arduino IDE.
- Ensure that you have installed the latest version of the Arduino IDE and the Arduino_MKRIoTCarrier library.
- Consult the serial monitor in the Arduino IDE for error messages that can provide clues to the problem.
By following these steps and tips, you should have a fully functional MKR IoT Carrier setup, ready for your next IoT project. This foundational setup will pave the way for more advanced configurations and customizations as you delve deeper into your IoT journey.
Practical Applications and Project Ideas
The MKR IoT Carrier is a versatile platform that lends itself to a myriad of practical applications and project ideas. Its integration capabilities make it an ideal choice for smart home automation, environmental monitoring, and remote control systems. Below, we explore some real-world use cases that highlight the potential of the MKR IoT Carrier, providing inspiration and a foundation for your own IoT projects.
Smart Home Automation
The most popular applications of the MKR IoT Carrier is smart home automation. Imagine controlling your lights, thermostat, and security system with ease. Using the MKR IoT Carrier, you can create a centralized control system. Required components include the MKR IoT Carrier, various sensors (temperature, motion, light), actuators (relays, servos), and a Wi-Fi module. Start by setting up the MKR IoT Carrier and connecting it to your home network. Program it to monitor sensor data and control actuators based on predefined conditions. This project not only makes your home smarter but also enhances energy efficiency and security.
Environmental Monitoring
Environmental monitoring is another compelling application of the MKR IoT Carrier. Whether you are interested in tracking local weather conditions or monitoring indoor air quality, this carrier provides a robust solution. Essential components include the MKR IoT Carrier, sensors for temperature, humidity, air quality, and a cloud platform for data storage and analysis. Begin by assembling the sensors with the carrier and configuring them to send data to the cloud. This project can aid in making informed decisions based on environmental data, such as optimizing HVAC systems or identifying pollutant sources.
Remote Control Systems
Creating remote control systems is made simpler with the MKR IoT Carrier. This can range from remote-controlled vehicles to home appliances. For instance, a remote-controlled robotic car can be developed using the MKR IoT Carrier, motor drivers, and a Wi-Fi module. Start by integrating the motors and drivers with the carrier, then program the system to receive commands over the internet. This project showcases the power of IoT in enhancing convenience and enabling remote operation of devices.
The Programming Environment
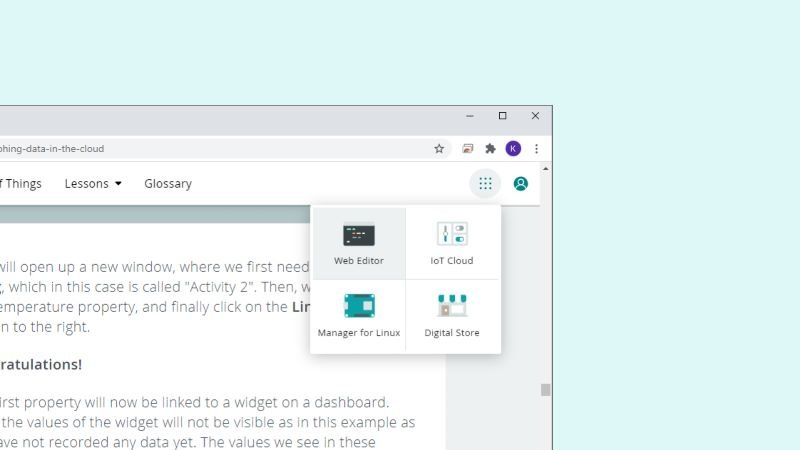
Arduino Web Editor
To program the MKR IoT Carrier, use the Arduino Web Editor available through Arduino Create. Ensure your board is connected correctly before starting.
MKRIoTCarrier Library
The MKRIoTCarrier library is essential for controlling and reading the components of the MKR IoT Carrier. Include this library at the top of every sketch.
#include <Arduino_MKRIoTCarrier.h>
MKRIoTCarrier carrier;
Core Programming Terms
Initialization
Include the MKRIoTCarrier library and create an object named carrier.
Setup
In the setup(), initialize the carrier and configure it for use.
void setup() {
delay(1500);
CARRIER_CASE = false; // Set to true if using the plastic casing
carrier.begin();
}
Loop
The loop() contains commands to read and control the carrier’s components.
void loop() {
float temperature = carrier.Env.readTemperature();
float humidity = carrier.Env.readHumidity();
float pressure = carrier.Pressure.readPressure();

// Example commands for reading and controlling components
carrier.leds.setPixelColor(3, 255, 0, 255); // Set LED color
carrier.leds.show(); // Display LED color

carrier.display.fillScreen(ST77XX_RED); // Red background
carrier.display.setTextColor(ST77XX_WHITE); // White text
carrier.display.setTextSize(2); // Medium text size
carrier.display.setCursor(20, 110); // Set text position
carrier.display.print("Temp: "); // Print text
carrier.display.print(temperature); // Print temperature
carrier.display.println(" C"); // Print unit
}
Building Your First Project
Connect your board to the computer and create a new sketch. Include necessary libraries and initialize variables.
Full Code Example
Here is a complete example sketch demonstrating various functions of the MKR IoT Carrier.
#include <Arduino_MKRIoTCarrier.h>

MKRIoTCarrier carrier;

void setup() {
delay(1500);
CARRIER_CASE = false;
carrier.begin();
}

void loop() {
float temperature = carrier.Env.readTemperature();
float humidity = carrier.Env.readHumidity();
float pressure = carrier.Pressure.readPressure();

carrier.leds.setPixelColor(3, 255, 0, 255); // Set LED color
carrier.leds.show(); // Display LED color

carrier.display.fillScreen(ST77XX_RED); // Red background
carrier.display.setTextColor(ST77XX_WHITE); // White text
carrier.display.setTextSize(2); // Medium text size
carrier.display.setCursor(20, 110); // Set text position
carrier.display.print("Temp: "); // Print text
carrier.display.print(temperature); // Print temperature
carrier.display.println(" C"); // Print unit
}
Summary
In this blog post, we explored the Arduino Oplà IoT Kit, focusing on the MKR IoT Carrier and MKR WiFi 1010 board. We set up the necessary software and created a basic program to read sensor data and display it. This foundational activity prepares you for more advanced projects with the Arduino IoT Cloud.